
Benefits of Installing Shower Wall Panels for a Budget-Friendly Shower
When looking for the most affordable way to install a shower, shower wall panels offer a cost-effective, durable, and easy-to-install solution. Compared to traditional tiling, wall panels require less labor, fewer materials, and offer long-lasting moisture protection.
Why Shower Wall Panels Are Cost-Effective
Shower wall panels help cut costs in several ways:
- Quick Installation: Unlike tiling, which involves time-intensive grouting, wall panels can be installed in hours, reducing labor costs.
- Low Maintenance: With fewer seams and no grout lines, wall panels resist mold and mildew better than tiles, reducing upkeep expenses.
- Long-Lasting: Wall panels provide durability, and when properly sealed, they offer excellent water resistance, helping avoid costly water damage.
Types of Affordable Shower Wall Panels
There are several affordable shower wall panel materials, each with unique benefits:
- Acrylic Panels: Durable and resistant to cracking, acrylic panels are mid-range in price and are available in various colors and patterns.
- Fiberglass Panels: A budget-friendly choice, fiberglass panels are easy to install and maintain, though they may require occasional refinishing.
- PVC Panels: Often the least expensive option, PVC panels are lightweight, waterproof, and available in many styles, although they may be less durable than other materials.
Affordable Materials for Shower Installation
Besides wall panels, other budget-friendly materials can make a shower installation more affordable without sacrificing quality.
Prefabricated Shower Units vs. Custom Showers
A prefabricated shower unit, or shower kit, is often the most economical choice for a new shower.
- Prefab Units: These all-in-one kits come with walls, bases, and sometimes doors, making installation simple and inexpensive.
- Custom Showers: While customizable, they are typically more costly due to additional materials and labor.
Cost Comparison: Prefabricated units and shower kits generally range from $300 to $1,500, while custom showers with tiling can start at $2,000 and go up significantly depending on materials.
Choosing Low-Cost Flooring and Fixtures
Flooring and fixtures can also impact costs. Here are a few budget-friendly options:
- Waterproof Vinyl Flooring: Affordable and easy to install, vinyl flooring is a popular choice for bathrooms.
- Basic Fixtures: Choosing simple faucets and showerheads reduces costs while still providing functionality.
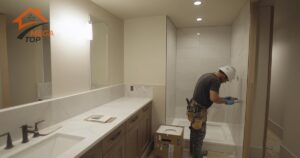
Step-by-Step Guide to Installing Shower Wall Panels
With wall panels and a few basic tools, you can complete a shower installation on a budget.
Step 1: Measure and Plan the Space
- Measure the Shower Walls: Note the dimensions of each wall where the panels will be installed.
- Order the Right Panel Sizes: Some panels are pre-cut, while others can be trimmed to fit.
Step 2: Prepare Walls for Panel Installation
Ensure the shower walls are clean and even:
- Remove Old Wall Material: If replacing tile or other materials, strip the walls down to a smooth, dry surface.
- Apply a Primer: A primer can help the adhesive bond securely to the wall surface.
Step 3: Install Shower Wall Panels
- Apply Adhesive: Use a waterproof adhesive on the back of each panel, focusing on the edges and center.
- Place Panels Carefully: Press each panel firmly onto the wall, starting with the back wall and moving to the side walls.
Adhesives and Fasteners Needed
For added security, consider using construction adhesive in combination with small screws or fasteners along the edges, which can later be hidden with caulk.
Step 4: Seal and Waterproof the Edges
Properly sealing the edges is critical for water protection:
- Apply Silicone Caulk: Seal all edges, corners, and panel seams with a mildew-resistant silicone caulk.
- Smooth and Let Cure: Use a caulking tool to smooth the sealant for a professional look and allow it to cure per the manufacturer’s instructions.
DIY vs. Hiring a Professional for Shower Installation on a Budget
Benefits of DIY Installation for Cost Savings
Many homeowners choose to install shower wall panels themselves to save on labor costs. Wall panel installations generally require basic tools and are more forgiving than tile installations, making them manageable as a DIY project.
When to Hire a Professional for Complex Installations
If plumbing modifications or complex shower layouts are involved, consider hiring a professional to ensure proper setup and avoid potential repairs.
Tips for Reducing Shower Installation Costs
Here are some strategies to keep your shower installation affordable:
Use Budget-Friendly Materials
Opting for budget materials like fiberglass or PVC panels instead of high-end stone or ceramic can significantly cut costs without sacrificing functionality.
Look for All-In-One Shower Kits
Many home improvement stores offer complete shower kits, which include the base, wall panels, and sometimes doors. These kits simplify the installation process and reduce expenses.
Choose Simple Designs and Layouts
A straightforward, minimalist design often costs less to install. Avoid complicated layouts or features that add extra labor, such as intricate tile designs or custom-built shelves.
Common Mistakes to Avoid in a Budget Shower Installation
Being aware of common pitfalls can save time and money by preventing the need for repairs.
Skipping Waterproofing
Even with waterproof panels, additional waterproofing in the form of caulking and sealant is essential to prevent leaks. Skipping these steps can lead to costly water damage.
Incorrect Panel Installation Techniques
Improper panel alignment or inadequate adhesive can result in loose or misaligned panels. Follow installation instructions closely to ensure panels fit snugly and securely.
Buying Incompatible Materials
Before purchasing materials, check compatibility, especially if working with existing bathroom fixtures. Using incompatible materials can lead to moisture issues, poor adhesion, or mismatched aesthetics.
Installing a shower doesn’t have to break the bank. By selecting affordable materials like shower wall panels, considering a prefabricated shower unit, and following cost-effective DIY methods, you can achieve a stylish and functional shower while keeping costs low. With proper planning and quality installation, your new shower can be both budget-friendly and durable.
FAQ
Wall panels are generally cheaper, with prices starting around $100 to $300 per panel, depending on the material.
Yes, most shower wall panels are designed to be waterproof and mold-resistant, making them ideal for showers.
Many homeowners can install wall panels DIY-style with basic tools, though professional help may be required for plumbing.
PVC panels are typically the cheapest, followed by fiberglass and acrylic options, which offer durability at a low cost.
Yes, prefab showers are usually less expensive and quicker to install than custom tiled showers.