
Preparing for Bathroom Sink Installation
Securing a bathroom sink to the countertop involves careful preparation to ensure a stable and lasting installation. Selecting the right materials and tools, as well as understanding the sink type, can make a significant difference in the process.
Choosing the Right Sink Type
Different sinks, such as drop-in, undermount, and vessel sinks, require unique approaches to installation. Each type comes with its own mounting requirements:
- Drop-in sinks are mounted directly on the countertop with a visible rim.
- Undermount sinks attach from below, offering a seamless look but often requiring additional support.
- Vessel sinks sit above the countertop, needing solid anchoring due to their height and positioning.
Selecting the Countertop Material for Sink Installation
Countertop materials can also affect the installation:
- Granite and quartz require specialized adhesives due to their weight and density.
- Laminate and wood countertops benefit from adhesive and may also need extra support to avoid shifting over time.
- Concrete countertops require both strong adhesives and heavy-duty anchors or clips to secure the sink effectively.
Tools and Materials Needed
Having the right tools and materials on hand is essential for a successful installation.
Essential Tools for Installation
- Drill and driver (for attaching brackets or clips)
- Measuring tape (to ensure sink alignment)
- Caulking gun (for applying adhesive)
- Wrench (for tightening bolts)
- Putty knife (to remove excess adhesive)
Choosing the Best Adhesive for Sinks
Not all adhesives are suitable for bathroom sinks. Silicone adhesives and two-part epoxy adhesives work best for a firm hold on various surfaces:
- Silicone adhesive offers flexibility and is ideal for smaller sinks.
- Epoxy adhesive provides a more rigid bond, ideal for heavier sinks or sinks with higher usage.
When to Use Mounting Brackets and Bolts
Mounting brackets and bolts add security to the installation, particularly for undermount and vessel sinks. These accessories help stabilize the sink and are especially beneficial when adhesives alone might not provide adequate support.
Step-by-Step Guide to Securing a Bathroom Sink
Follow these steps for a secure bathroom sink installation.
Step 1: Measure and Mark Sink Placement
Aligning the sink accurately ensures a secure fit and a balanced appearance:
- Measure the sink dimensions and mark the intended placement on the countertop.
- Ensure that the sink is centered and properly aligned with plumbing fixtures.
Step 2: Prepare the Countertop Surface
To ensure the adhesive bonds effectively:
- Clean the area with rubbing alcohol to remove dust, dirt, or oils.
- Lightly sand the countertop area where the sink will attach to enhance adhesion.
Step 3: Apply Sink Adhesive to the Countertop
Proper application of adhesive is key to a secure installation.
Types of Sink Adhesives: Pros and Cons
- Silicone adhesive: Offers flexibility, making it suitable for countertops that may expand slightly.
- Epoxy adhesive: Forms a stronger, more rigid bond, suitable for heavy sinks or high-traffic bathrooms.
Using a caulking gun, apply a continuous bead of adhesive around the edge of the sink area.
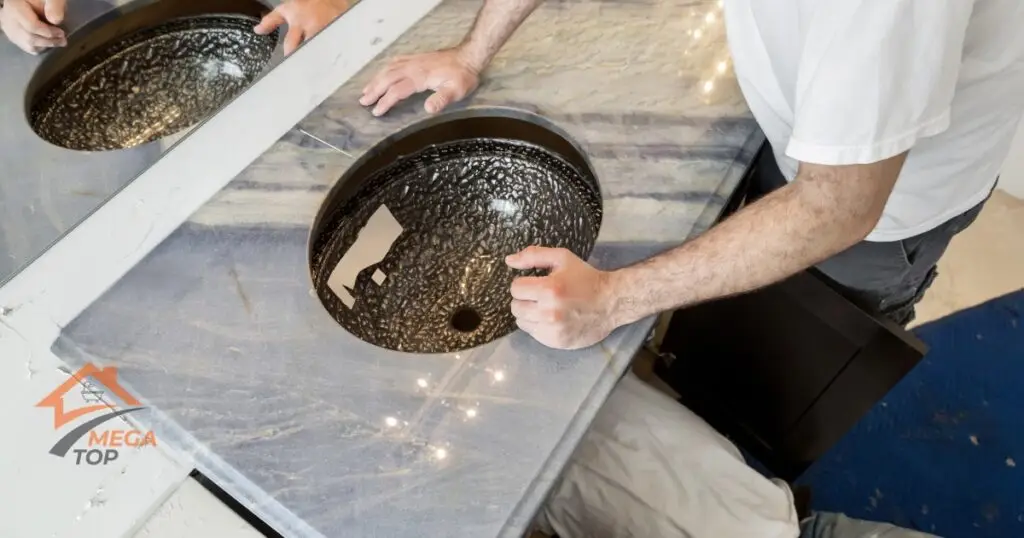
Step 4: Position the Sink Carefully
Once the adhesive is applied:
- Carefully place the sink onto the countertop, aligning it with the markings.
- Press firmly to ensure the adhesive spreads evenly and creates a strong bond.
Step 5: Use Mounting Brackets for Extra Security
For additional security, especially for undermount and vessel sinks:
- Attach mounting brackets underneath the sink and secure them to the countertop.
- Use screws or bolts, depending on the bracket design, to anchor the sink.
Types of Mounting Brackets for Sinks
- Side-mounted brackets: Commonly used for undermount sinks.
- Clamp brackets: Ideal for heavier sinks that require extra support.
Step 6: Anchor with Bolts or Clips as Needed
Some sink models come with pre-installed bolts or require clips to reinforce the attachment. Tighten these supports as needed without over-tightening, as this can cause cracks or damage.
Allowing Proper Adhesive Curing Time
Allowing adequate curing time is essential to ensure the sink bonds fully to the countertop.
Tips for Ensuring a Strong Bond
- Avoid placing any weight on the sink during curing.
- Check adhesive instructions, as some may require up to 48 hours for optimal bonding.
Common Mistakes to Avoid During Curing
- Applying too much adhesive: Excess adhesive can make positioning difficult and may compromise stability.
- Rushing the curing process: Prematurely using the sink before it cures fully can weaken the bond and cause misalignment.
Testing Stability and Making Adjustments
Once the adhesive cures, test the sink’s stability to confirm that it is securely attached to the countertop.
How to Check Sink Stability
- Gently apply pressure on the sink edges to ensure there is no movement.
- If the sink shifts or appears unstable, tighten any brackets or add extra adhesive if necessary.
Adjusting Anchors and Adhesive if Loose
In cases where the sink feels loose:
- Re-tighten mounting bolts or clips.
- Apply additional adhesive to areas that need reinforcement.
DIY vs. Professional Bathroom Sink Installation
Deciding between a DIY and professional installation can impact the final result.
Risks of DIY Installation: Common Issues to Watch For
- Misalignment: DIY installations may result in improper sink placement, which affects water flow and appearance.
- Adhesive application errors: Incorrect adhesive or insufficient application can lead to leaks or instability over time.
- Bracket issues: Improperly installed brackets may fail to support the sink securely.
Benefits of Hiring a Professional Installer
Professional installers bring expertise and tools that ensure a strong, reliable installation. Professionals understand how to work with various sink and countertop types, ensuring the sink remains secure long-term.
Case Studies: DIY vs. Professional Installation Success Rates
- DIY installation: Many DIY projects require reinstallation due to issues with adhesive curing or alignment.
- Professional installation: Professionals achieve a high success rate, with fewer cases of leakage, loosening, or detachment.
Hiring a professional installer can save time, reduce errors, and provide peace of mind for homeowners, ensuring the bathroom sink is secured properly for years to come.
FAQ
For a strong hold, use a silicone-based adhesive or epoxy that’s specifically designed for sinks and countertops.
Most adhesives require 24 to 48 hours for full curing. Check the adhesive instructions for exact curing time.
Mounting brackets add extra security, especially with heavier sinks or undermount styles, making them a worthwhile addition.
Yes, but the adhesive and anchor methods may vary based on the countertop material (e.g., granite, laminate).
Professionals ensure a secure installation, reducing the risk of leaks, loosening, or misalignment issues over time.