INTRO
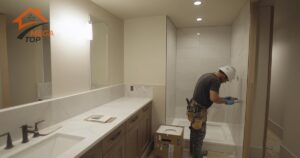
Waterproofing shower walls is essential for preventing leaks, mold, and long-term water damage. Without proper protection, moisture can seep into the tile, grout, and drywall, leading to costly repairs and structural issues. Whether you’re remodeling a bathroom or simply improving its durability, using the best waterproofing methods ensures your shower stays safe, clean, and mold-free for years.
Why Waterproofing Shower Walls is Critical
Many homeowners overlook waterproofing, assuming tile and grout are naturally water-resistant. However, without proper sealing, water can seep through small cracks and gaps.
✔️ Prevents Mold & Mildew – Stops moisture buildup, reducing the risk of harmful bacteria growth.
✔️ Protects Tile & Grout – Keeps tiles from loosening and grout from crumbling over time.
✔️ Increases Durability – A properly waterproofed shower extends the lifespan of bathroom materials.
✔️ Prevents Costly Repairs – Avoids wall damage, leaks, and rotting drywall.
💡 Pro Tip: Even small gaps in grout or cracks in tile can let moisture penetrate shower walls, leading to hidden damage.
The Best Methods for Waterproofing Shower Walls
1. Applying a Waterproof Membrane
A waterproof membrane is the first line of defense against water penetration.
✔️ Sheet Membrane – Installed behind the tiles, acting as a protective barrier.
✔️ Liquid Membrane – A paint-on or roll-on waterproof coating applied to walls before tiling.
💡 Pro Tip: Use waterproof membrane systems like Schluter®-KERDI or RedGard® for maximum protection.
2. Sealing Grout for Extra Protection
Standard grout is porous, allowing moisture to seep through if not properly sealed.
✔️ Epoxy Grout – The best choice for waterproofing, as it is completely non-porous.
✔️ Grout Sealants – Applied over standard grout to create a protective water barrier.
💡 Pro Tip: Reseal grout every 6-12 months to maintain a watertight seal.
3. Using Cement Backer Board Instead of Drywall
Standard drywall absorbs water, leading to damage, mold, and structural issues.
✔️ Cement Backer Board (CBU) – The best choice for wet areas like showers.
✔️ Foam Board (Wedi, Schluter) – Waterproof and lightweight, providing extra protection.
💡 Pro Tip: Always use waterproof tape and sealant on backer board seams to prevent water leaks.
4. Installing Waterproof Sealants & Caulking
Silicone-based caulking seals gaps where water can seep in, especially around:
✔️ Shower corners & edges – Prevents water from getting behind tiles.
✔️ Fixtures & plumbing connections – Seals gaps where pipes enter walls.
💡 Pro Tip: Use 100% silicone caulk instead of acrylic-based caulks for better flexibility and water resistance.
5. Proper Drainage & Slope for Water Flow
Even perfect waterproofing won’t work if the shower isn’t properly sloped.
✔️ Ensure a slight slope toward the drain to prevent water pooling.
✔️ Use a linear drain system for modern, efficient water flow.
💡 Pro Tip: Incorrect sloping can lead to standing water, which increases mold and mildew growth.
DIY vs. Professional Waterproofing: Which is Best?
DIY Waterproofing
✔️ Best for small repairs (like resealing grout or caulking).
✔️ Can be done with basic tools and waterproofing products.
✔️ Affordable but requires careful application to be effective.
Professional Waterproofing
✔️ Best for full shower remodels or major waterproofing projects.
✔️ Ensures proper installation of membranes, drains, and backer boards.
✔️ Reduces the risk of long-term water damage and costly repairs.
💡 Pro Tip: If your shower already has water damage, it’s best to hire a professional for full waterproofing.
Common Waterproofing Mistakes to Avoid
🚫 Skipping the Waterproof Membrane – Tile alone is not waterproof.
🚫 Not Sealing Grout – Unsealed grout allows moisture penetration.
🚫 Using Standard Drywall – Mold and rot will develop behind tiles.
🚫 Improper Caulking – Gaps in caulk allow water leaks into walls.
💡 Pro Tip: Regularly inspect and maintain your shower to catch early signs of moisture damage.
How Often Should I Reapply Waterproofing?
✔️ Grout Sealant – Every 6-12 months, depending on water exposure.
✔️ Silicone Caulk – Replace every 1-2 years when it starts cracking or peeling.
✔️ Waterproof Membranes – Last 10+ years if installed correctly.
💡 Pro Tip: If you notice discoloration, soft tiles, or peeling caulk, it’s time to reapply waterproofing.
Budgeting for a Shower Waterproofing Project
💰 Estimated Costs:
✔️ DIY Waterproofing (Sealants, Membranes, Caulk): $100 – $500
✔️ Professional Waterproofing (Full Installation): $1,500 – $5,000
✔️ High-End Waterproofing (Custom Tile, Drainage, Smart Features): $6,000+
✔️ Ways to Save:
- Use liquid waterproofing membranes instead of sheet membranes to cut costs.
- Seal grout and re-caulk regularly to avoid expensive repairs later.
💡 Pro Tip: Investing in proper waterproofing now saves thousands in potential water damage repairs.
Testimonials from MegaTop™ Customers
⭐ “We had constant mold issues until we waterproofed our shower walls properly. Now, it looks amazing!” — Julianne F., Brookfield, WI
⭐ “MegaTop™ installed a full waterproofing system in our bathroom, and we’ve had no leaks since!” — Allan J., Spokane Valley, WA
⭐ “I love how easy it was to DIY my grout sealing with MegaTop™’s recommended products!” — Sophia O., League City, TX
Did You Know?
💡 Did you know that improper waterproofing is the #1 cause of shower tile damage? A small leak can cause major structural issues over time.
TL;DR Summary
✔️ Waterproofing shower walls prevents leaks, mold, and costly damage.
✔️ Best methods: Waterproof membranes, sealed grout, cement backer boards, and silicone caulking.
✔️ DIY vs. Professional: Small fixes can be done yourself, but full waterproofing is best left to experts.
✔️ Reapply waterproofing: Seal grout every 6-12 months, caulk every 1-2 years, and membranes last 10+ years.
✔️ Budget wisely: DIY solutions start at $100, while full professional waterproofing can cost $1,500+.
✨ Need expert waterproofing? MegaTop™ specializes in long-lasting, professional shower waterproofing. Contact us today! 🚿✨
Get in Touch
Ready to transform your bathroom with a stunning new floor? Contact us today for a free estimate!
Fill out our online contact form 📧 or call by phone 📞 for a fast response.
We’re here to answer your questions, provide expert advice, and guide you through every step of the process. Call us, email us, or fill out our quick online form to get started. Let’s bring your vision to life!
FAQ
The best method is using a waterproof membrane, sealing grout, and installing cement backer board instead of drywall.
Every 6-12 months to keep tiles protected from moisture.
Yes! Applying sealants, grout sealer, and liquid waterproofing membranes is a great DIY project.
Popular options include Schluter®-KERDI and RedGard®, both highly effective at blocking moisture.
Yes! Unsealed grout absorbs moisture, leading to mold and crumbling tiles over time.